
The objective of this document is to provide comprehensive and user-friendly documentation for the A41 Customer Portal.
The documentation aims to empower the clients to effectively navigate the portal, utilize its features, and make the most of their interactions with A41 support and services.
By offering step-by-step instructions, explanations, and tips, this document will assist users in accessing information, raising issues, managing cases, and utilizing the self-service options provided by the portal.
| Approval | A process in which users review and authorize specific actions or changes before they are implemented |
| Breadcrumbs | Navigational elements that show the path to the current page or location within a website or application |
| Case | A comprehensive record that tracks the lifecycle of an incident, request, change, or problem, including interactions and updates |
| Catalogue | A list of services, products, and items available for users to request or access |
| Change | A formal request for alterations to an existing service, system, or configuration |
| Communication Preferences | User-configurable settings that determine how and when they receive notifications and updates |
| Customer Portal | An online platform that provides customers with access to information, support services, and self-service options related to products and services |
| Incident | An unplanned interruption or reduction in quality of a service, often reported by users |
| Integration | The process of connecting different systems or applications to work together and share information |
| Keyword | A specific word or phrase used to search for information within a system or database |
| Notification | A message or alert that informs users about updates, changes, or events related to their interactions |
| Problem | The underlying cause of one or more incidents, identified and resolved to prevent recurrence |
| Profile | User-specific information and settings associated with an account within a system or application |
| Request | A formal user request for a service or information, often processed through predefined workflows |
| Resolution | The outcome or solution that resolves an incident or issue reported by a user |
| Self-Service | A feature that allows users to independently find information, request services, and solve issues without human intervention |
| Search Results | The list of items or documents that match the keywords entered in a search query |
| ServiceNow | A cloud-based platform that offers various IT service management (ITSM) and customer service management (CSM) solutions |
| Single Sign-On (SSO) | An authentication method that allows users to access multiple applications with a single set of login credentials |
Getting started
The ServiceNow Customer Portal is designed to be accessible from a variety of web browsers to ensure a seamless and user-friendly experience for all users.
Whether you are helping customers access our portal for support, information or service requests, you have the flexibility to choose from several popular web browsers. Here are some of the browsers you can use:
- Microsoft Edge
- Google Chrome
- Safari
Please ensure that the browser chosen by the customer is always up to date so that the latest security features can be used.
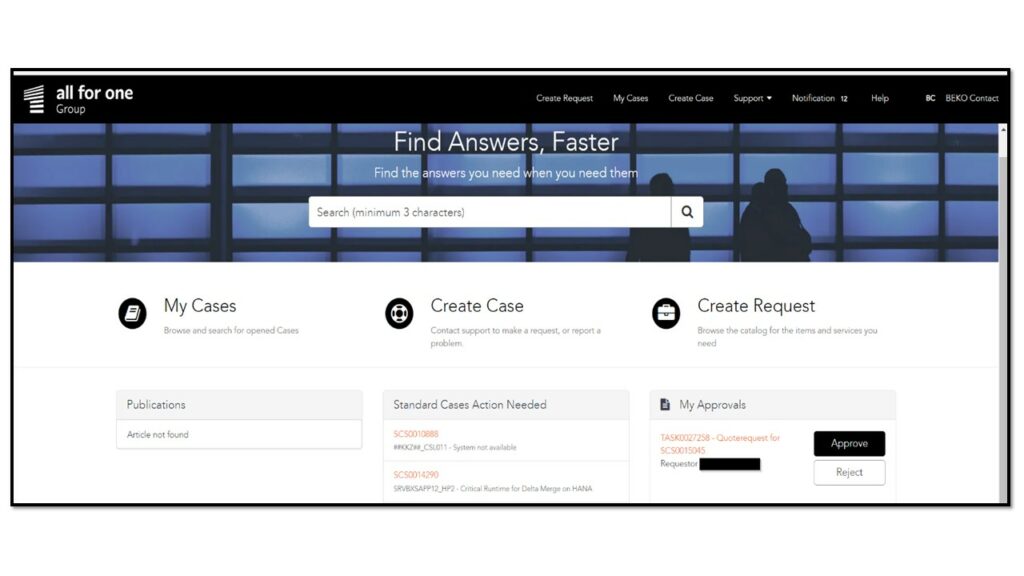
Navigating the Portal
Customer Service Portal Homepage
The home page serves as the starting point for the customer portal experience. From here, customers have access to various functions and features tailored to their needs.
- After logging in, one is redirected to the home page of the customer service portal.
- This homepage serves as the central point of access to various functions and options tailored to the customer’s needs.
Once logged in, the client sees personalised information and options about their account, cases and queries.
- As a logged-in user, they see personalised information, case details and notifications about their account.
- The client can use the navigation menu, the search bar and the „Name“ tab to access the different sections of the portal.
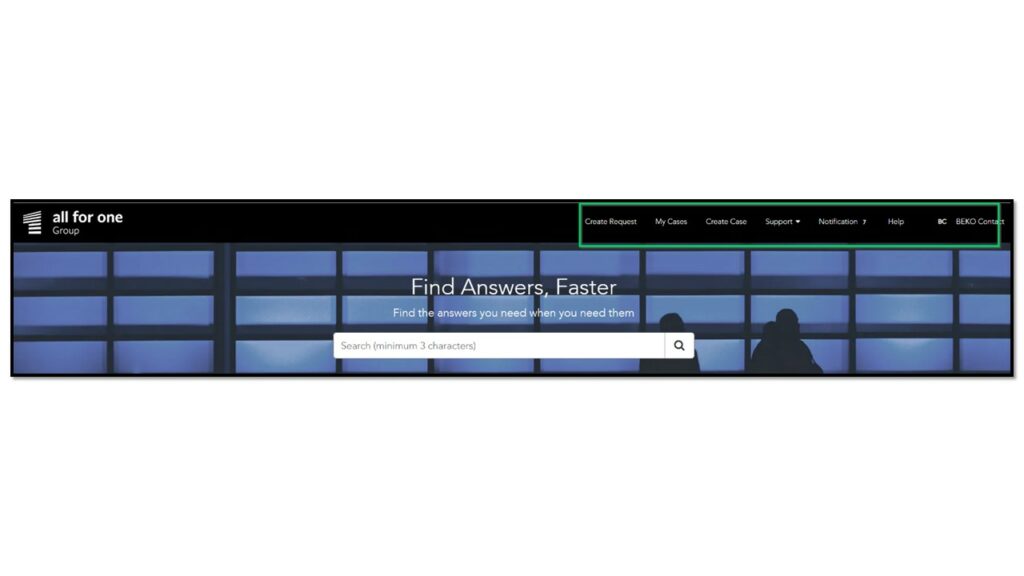
Profile Menu
- By clicking on the profile button, the profile is displayed, below which you can log out of the portal.
Help
- Guided tours are an additional support for the effective use of the customer service portal.
Support – These sections provide you the following view:
- Instal Base: All the install base details assigned to the Account.
- Products: All products related to the Account.
- Support profile: This section provides the option to update your profile picture. Update your user preference and language. Update your notification preference. Change/Update your password.
User Profile
Change your password
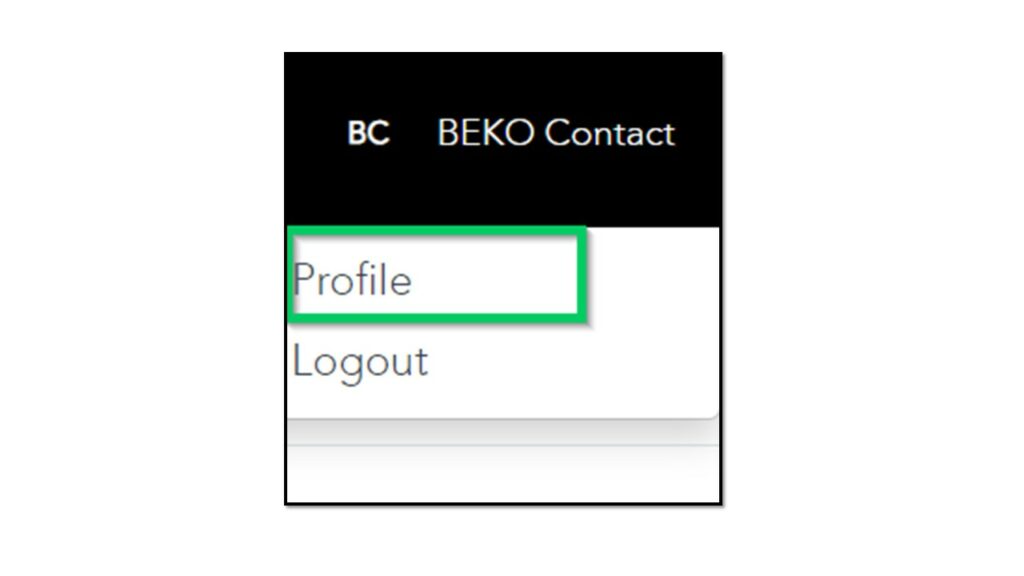
Step 1: Access User Profile
- Click on the profile picture in the upper right corner of the portal and select „Profile“.
Step 2: Navigate to Security Settings
- Within the profile, go to „Security settings“ and click on „Change password“.
Step 3: Enter Current Password
- The customer is prompted to enter the current password as a security measure.
Step 4: Enter New Password
- The client should now enter his new desired password. He should make sure that it meets all the complexity criteria specified.
Step 5: Confirm New Password
- Now the customer should enter the new password again to check that it is correct.
Step 6: Save Changes
- After the new password is entered and confirmed, the changes should be saved to update the password.
Update User Profile
Step 1: Access User Profile
- Click on the profile photo and select „Profile“.
Step 2: Edit Profile Details:
- Search within the profile for editable fields such as name, contact information or settings.
Step 3: Make Changes:
- Update the information that is being changed, e.g. phone number or email address.
Step 4: Verify Changes
- Check the accuracy of the changes that have been made.
Step 5: Save Changes
- When satisfied with the changes, save to update the user profile.
Update User Preference
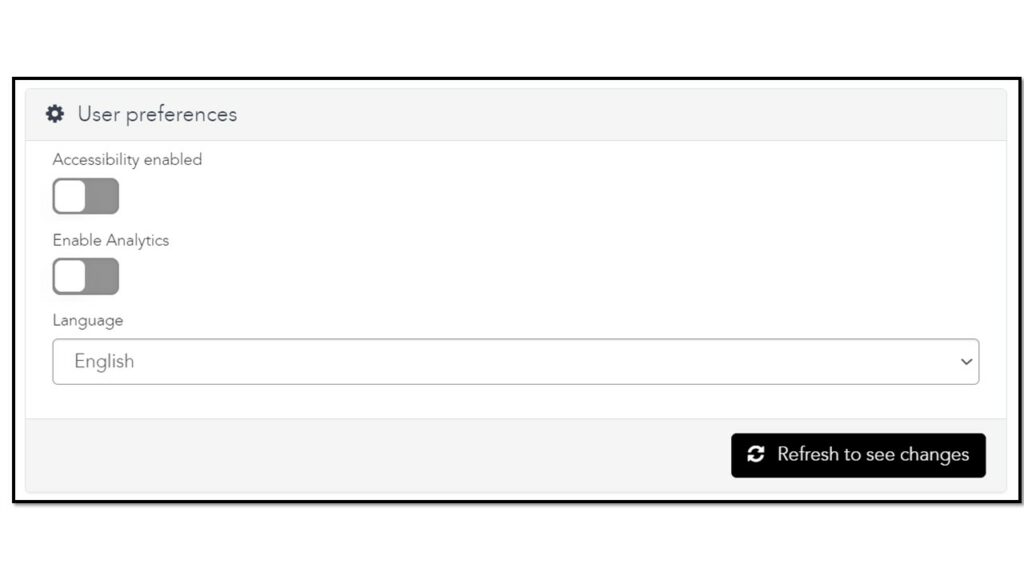
Step 1: Access the User Profile
- Click on the profile photo and select „Profile“.
Step 2: Navigate to User Preferences:
- Search Profile Settings for the „User Preferences“ section.
Step 3: Enable Accessibility
- Enable/disable accessibility and click the „Refresh to see changes“ button.
- If this option is activated, you will see more (?) fields on the forms explaining the fields in the standard case form.
Step 4: Enable Analytics
- Click on the toggle button to activate analytics and click on the „Refresh“ button to see changes.
Step 5: Change Language
- Select the language in the drop-down list to choose the preferred language and click the „Update to see changes“ button.
How to – Guide (Customer view)
Create a case – Customer view
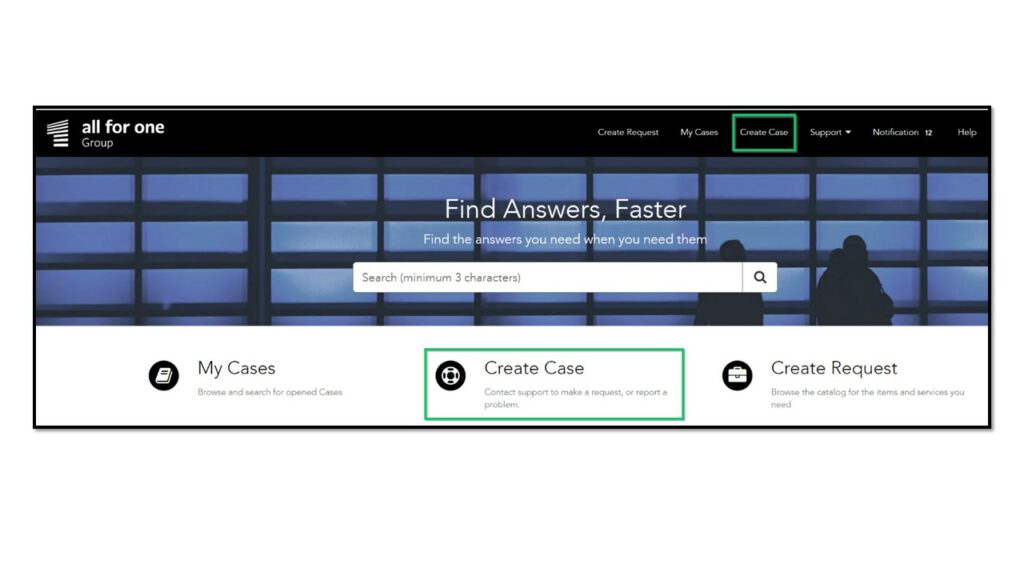
Step 1: Navigate to „Create Case“
Once the client is logged in, he/she should look for the option „Create case“ on the portal home page. Click on it to start the case creation process.
Step 2: Provide Information on the New Case Form
A dynamic form for a new case is displayed. Depending on the response, more fields may be displayed to enter information. Follow the prompts to provide the required information:
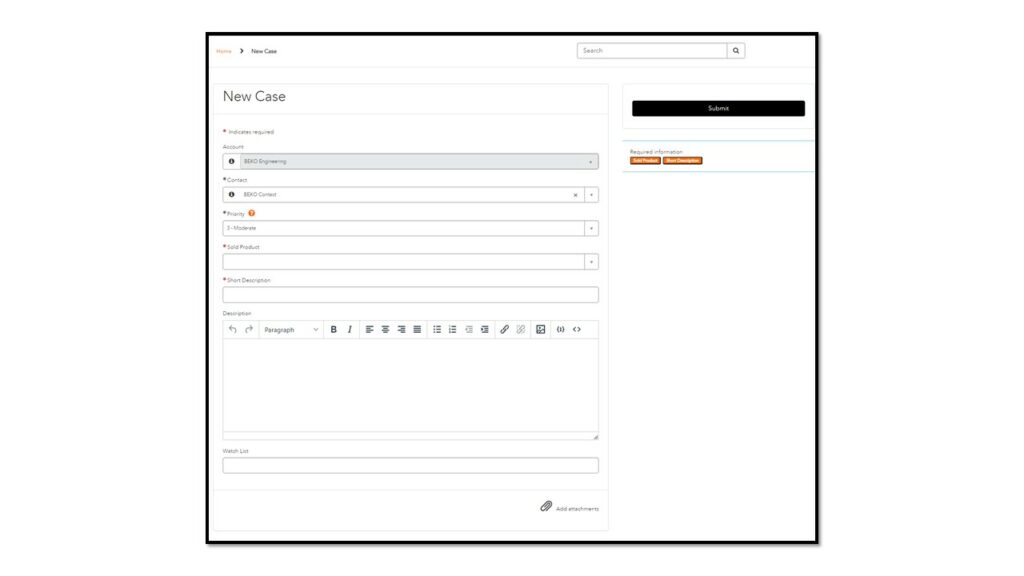
| Account | By default, this field is pre-filled with the account of the logged-in user. |
| Contact | By default, this field is pre-filled with the name of the logged-in user. However, you can modify it to assign the case to any other contact under the account if needed. |
| Priority | Select the appropriate priority level for your case from the available options. If you need more information about each priority level, you can refer to the ( ?) symbol tooltip for priority definition details. By default, the priority level will be set to 3-Moderate. |
| Business Impact (Only when Priority 1 – Critical is selected) | If you choose „Priority 1 – Critical,“ you’ll be prompted to provide the business impact related to the issue or case. This helps in prioritizing critical cases effectively. |
| 24/7 Contact (Only when Priority 1 – Critical is selected) | Provide contact information that is reachable 24/7, especially if the issue requires immediate attention outside regular business hours. |
| Sold Products | Specify the product(s) related to the case or issue. This helps categorize and address the problem accurately. Click on the (Info) information symbol to access the full detail of the selected sold product. |
| SAP maintenance product (additional fields will appear): | o SUser: Provide the SUser associated with the SAP maintenance product. o SAP Component: Specify the SAP component related to the issue. o SAP System: Indicate the SAP system linked to the problem. |
| Short Description | Enter a brief and concise summary or title for your case. This should provide a quick overview of the issue. |
| Description | In this field, provide a detailed and comprehensive description of the issue. Include any relevant information that can help support teams understand the problem thoroughly. |
| Watchlist | List all the contacts who wish to be informed or kept in the loop about this case. This can include team members, or anyone interested in the case’s progress. |
| Attachment | If you have any relevant attachments, such as screenshots, documents, or files related to the issue, you can attach them to the case to provide additional context. |
Step 3: Submit Your Case
- Check all information for accuracy.
- Click on the „Submit“ button to initiate the case creation process. The case is logged in the system and the customer receives a confirmation of the creation.
- Now a case has been successfully created in the ServiceNow customer portal and all important details for efficient problem solving are provided.
Overview of created cases
After creating a case, users will be directed to the following view
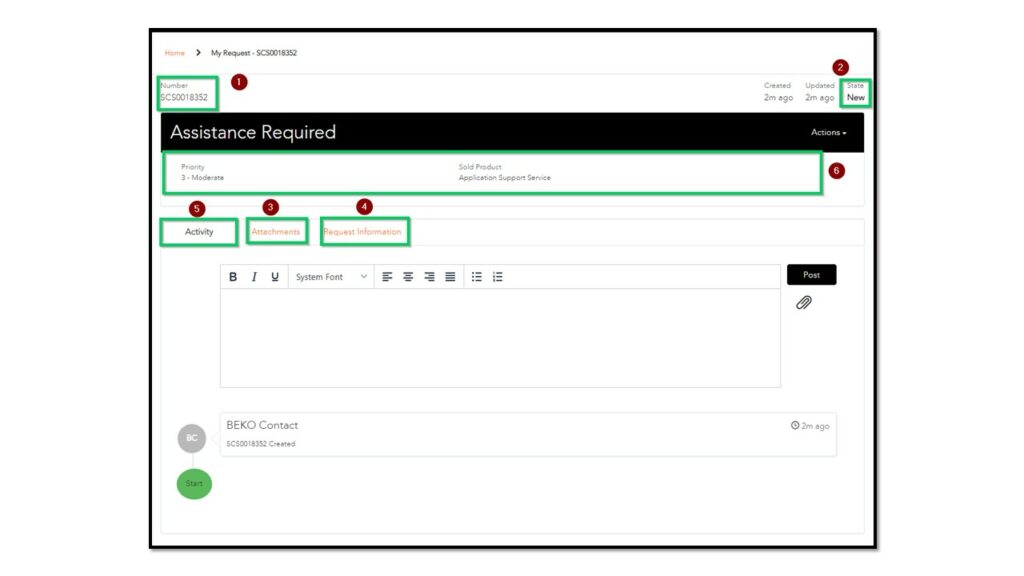
- Case Number: Users will locate the unique identification number assigned to the case they’ve just created.
- State: The case will initially be in the ‚NEW‘ state, allowing users to return to this view anytime to monitor its status.
- Attachments: Users can access any files or documents linked to the case.
- Request Information: Users will find here a summary of the information they provided when requesting the case.
- Activity: Users will find all the information provided by the agents, visible to the user. Users can also communicate with the agent by updating the text field and clicking ‚Post.‘
- Key Information: This space contains crucial details such as case priority, sold products, and the agent currently assigned to the case, providing users with a comprehensive overview of their case.“
Check the Status of the Case
If these steps are followed, the status of a case can be easily checked in the ServiceNow customer portal.
Step 1: Access to „My Cases
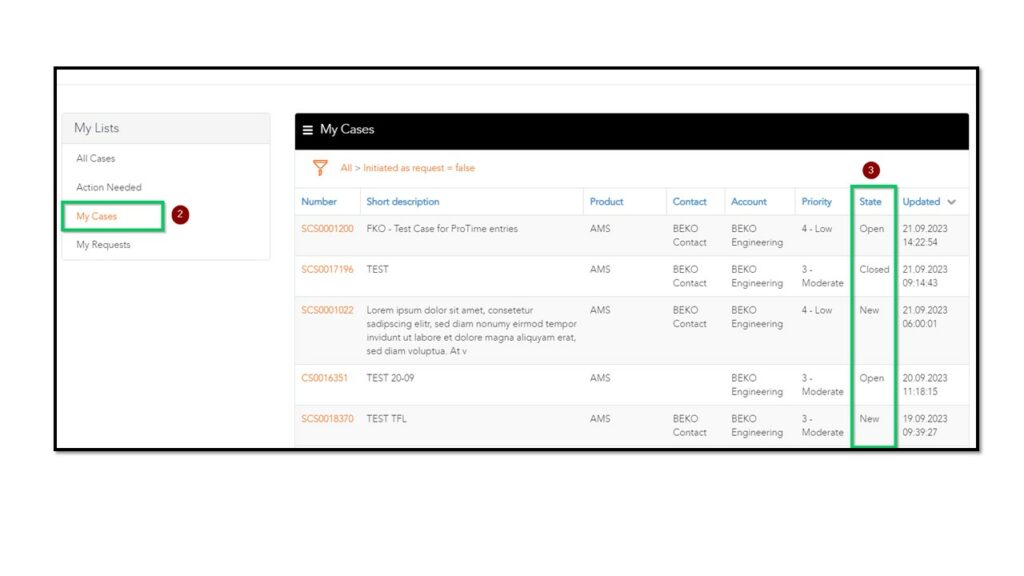
- After the customer has logged in, the customer should access the „My Cases“ option, which is usually located in the main menu. By clicking on „My Cases“, one can access a list of cases.
Step 2: Select „My Cases“.
- In the „My Cases“ section, you will see a list of cases linked to the account. This list contains case numbers and other relevant details.
Step 3: Search and check the status of the case.
- If the case number to be checked is known, one can simply search for it in the list.
- When the case that the client is interested in is found, the client should look at the „Status“ associated with that case. The „Status“ column shows the current status of the case.
- For example, the case status can be „New“, „Open“, „On Hold„, „Resolved“ or „Closed“.
Review Cases which the clients action is required
By following these steps, the All for One Customer Portal can easily be used to review cases that require action by the customer, such as confirming or rejecting proposed solutions.
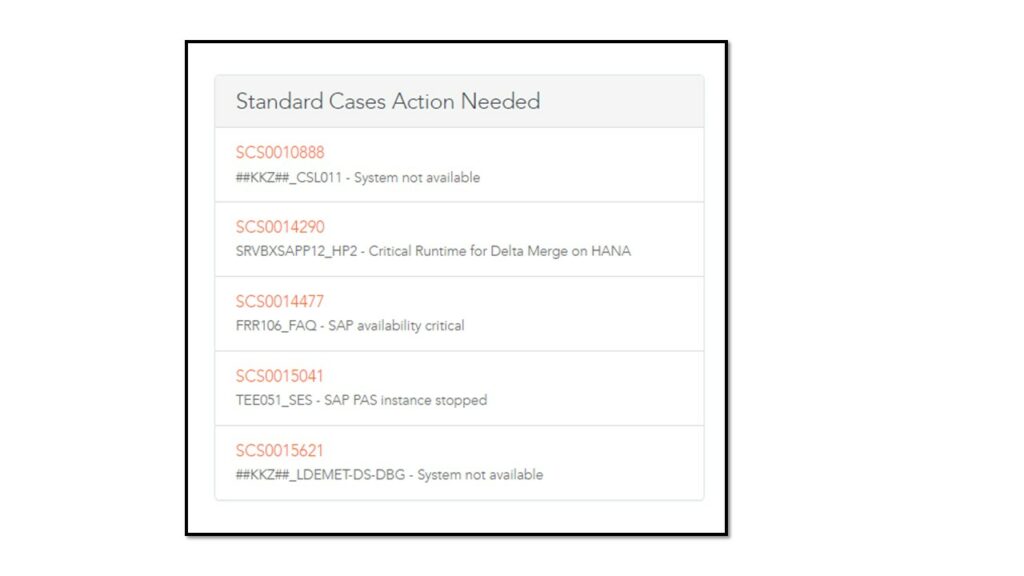
Step 1: Select „Standard Cases Action Needed“ Cases
- Click on „Standard cases – action required“ on the start page. There the client sees a list of cases that need to be processed. The case to be reviewed can be found by the case number or other relevant details in the list.
- When the desired case is found, click to open the case details.
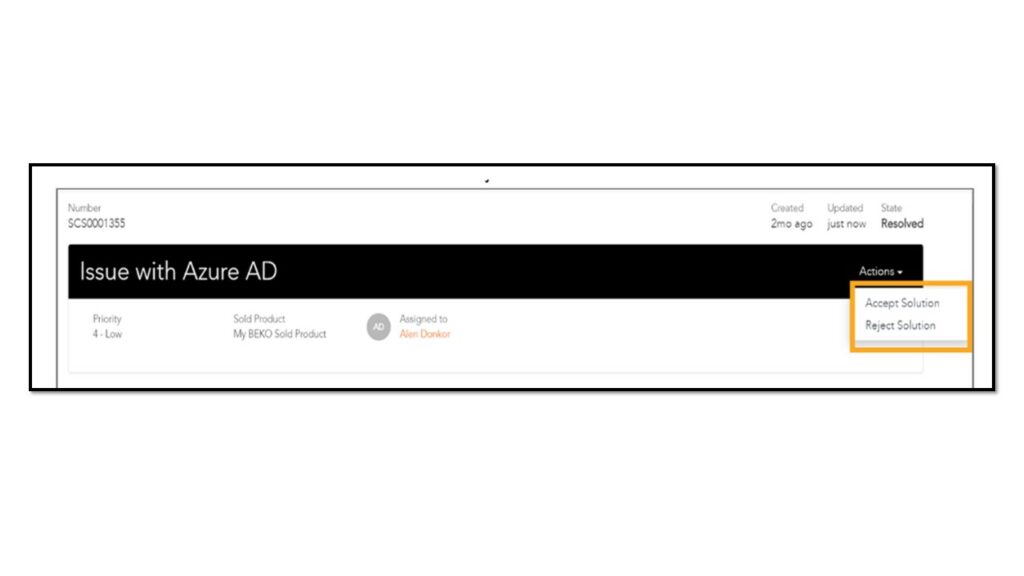
Step 2: Take Action on the Case
- In the opened case, look for an „Action“ drop-down menu. In this menu, the client has the option to accept or reject the proposed solution.
- Choose one of the following options based on assessment of the proposed resolution:
- Accept: If you agree with and accept the proposed solution, select this option to confirm your acceptance.
- Reject: If you disagree with or refuse the proposed solution, select this option to reject it and provide your “Reason for rejection”.
Quote Approvals
Step 1: Receive the Quote Approval Notification
- When the agent requires additional hours to complete a customer request, they will raise a quote request. You, as the customer, will receive a notification regarding this quote request. This notification can be sent via email.
Step 2: Access the Quote Approval
- In the notification the customer receives, the customer will find a link to access the quote approval directly. The customer can either click on the link in the email or access it via the ServiceNow customer portal.
Step 3: Access Quote Approval in the Customer Portal
- If the client chooses to access the quote approval via the client portal, they must log in to their account
- After logging in, navigate to the portal home page.
Step 4: Locate the „My Approvals“ Section
- On the home page or dashboard of the client portal, you will find the section „My approvals“. This section usually lists pending approval requests.
Step 5: Select the Quote Request in Question
- In the „My Approvals“ section, you should see the quote request that requires the client’s approval. Click on the relevant quote request to open it.
Step 6: Review Agent Information in the Activity Stream
- Within the quote request, there is an „Activity Stream“ that displays information about the agent’s request. Review the information to understand the details of the quote request, including the additional hours requested.
Step 7: Approve the Quote Request
- After the agent’s information and the quote request are reviewed by the customer, the customer will usually see an „Approve“ button on the quote request interface.
- Click on the „Approve“ button to confirm approval of the quote request.
Step 8: Confirmation
- Once „Approve“ has been clicked, the agent is notified and the status of the operation changes from „On Hold“ to „Open“.
When these steps are followed, the customer can easily review and approve quote requests in their ServiceNow customer portal.