Create New Standard Case
There are two options to create a new case. You can either go from
- Start page: – Click on the add (+) symbol on the header to create „New Standard Case“
or
- Case List: – from any case list or click NEW at the top right of any cases list
Standard Case Form
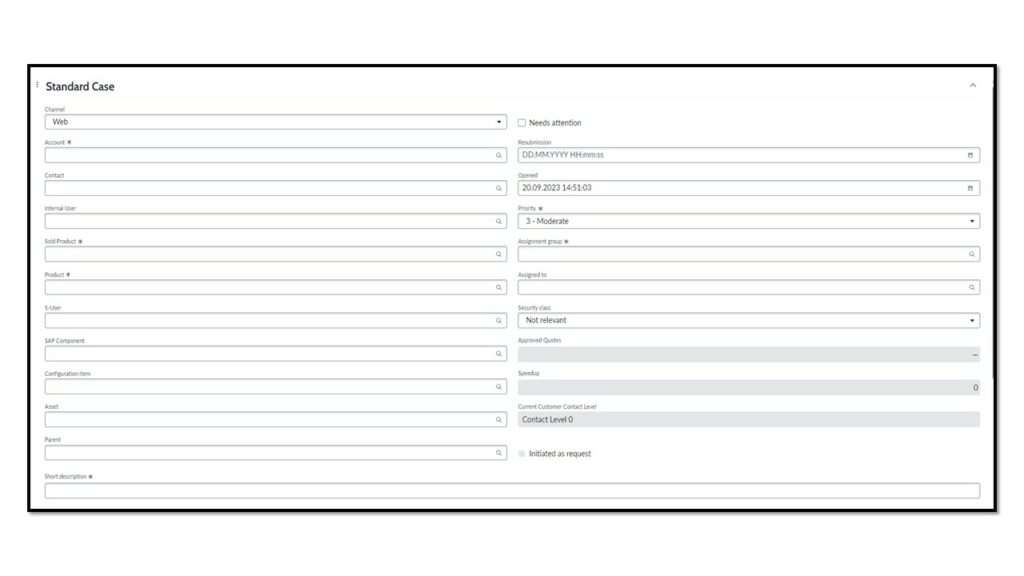
| Channel | The method by which the case was reported |
| Account | The company associated with this case |
| Contact | The caller and point of contact for the selected account on this particular case |
| Internal User | At All for One |
| Sold Product | The type of asset and the specific item sold to the Account |
| Product | The type of asset and the specific item to which this case pertains |
| S-User | Is the SAP user ID which agents/customer used |
| SAP Component | This field is only required the if the Sold product is SAP Maintenance |
| Configuration Item | The CI related impacted by the case |
| Asset | Is the tag number or serial number of the asset associated with this case |
| Parent | Related case linked to the current case |
| Short Description | A summary of the question or issue. Click Agent Assist at the right side bar (Academic hat) to search the text against documented solutions for the agent or the customer. |
| Needs Attention | Agents can enable the checkbox if the case requires attention. |
| Resubmission | Date and time for case resubmission (if applicable) |
| Opened | Date and time the case was opened |
| Priority | The relative importance of the case. Can populate based on case details |
| Assignment Group/Assigned to | The group and individual currently accountable for this case. The group automatically populates based on case details. The suggested agent matrix helps the group select an assignee based on skill, availability, and case load |
| security class | Of the case. Find more information on the “show help” tab on the top right of the screen |
| Approved Quotes | Track the hours pre/approved by the customer |
| Speedups | Tracks the number of speedups interactions related to the case |
| Description | Here you write down the issue more detailled. |
| Initiated as a request | The checkbox will update if the case was created form a request |
Notes
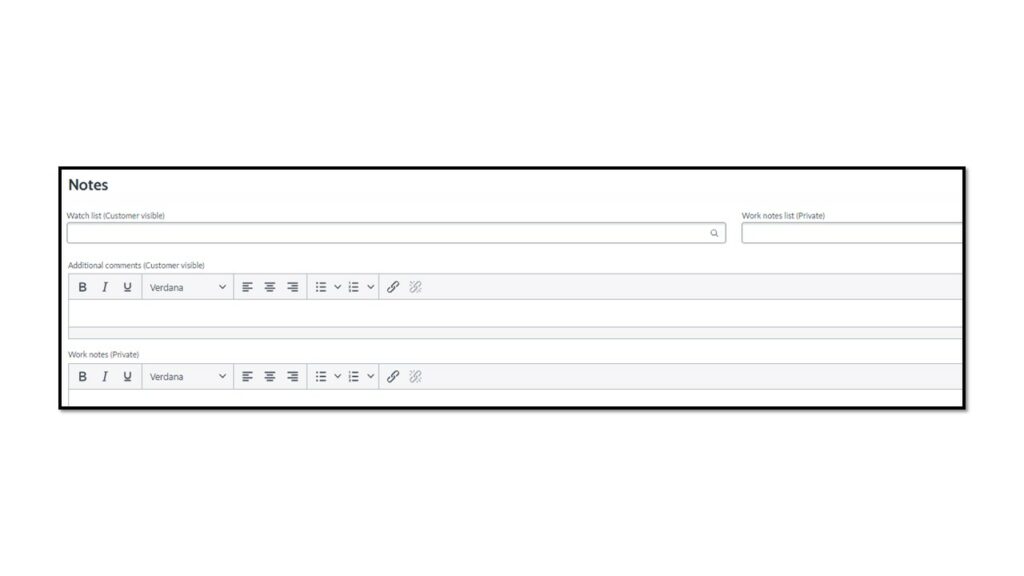
Add more information about the case in the Additional comments (Customer visible) field. Work notes (Private) are used to document internal case activities and are stored in the activity stream.
!Comments are automatically emailed to the account contact when saved!
Related Record section
Related records created from the case will automatically be linked in this section. Agents can also manually link records by using the “magnifier” search symbol-
- Incident
- Problem
- Change Request
- Caused by Change
SAP Collaboration
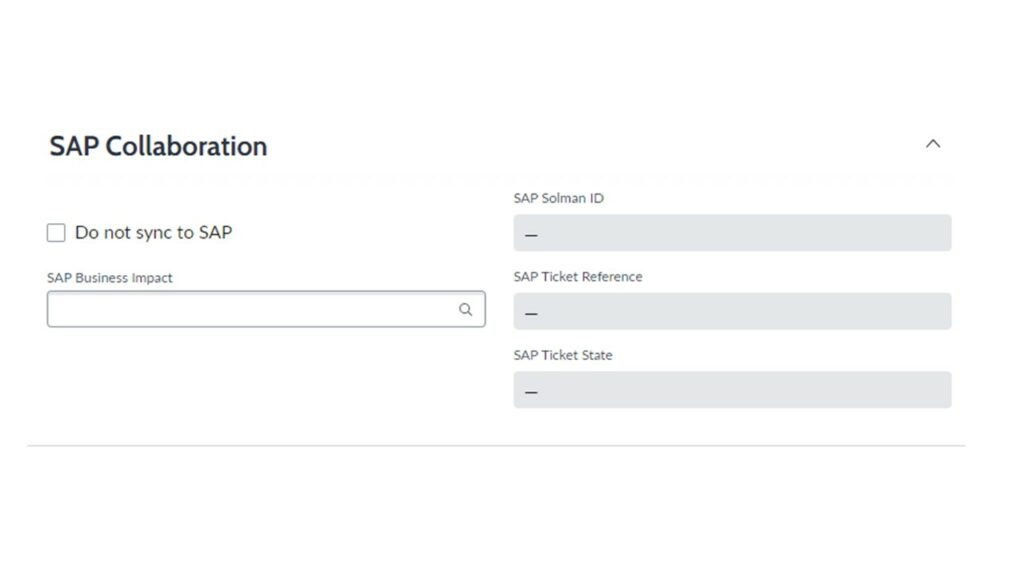
- Ticket is sent to SAP. Here you can control the information that is shared onward with SAP
- SAP Business Impact Field: Once you created a new SAP Business Impact for your case you can link it here.
Investigate and Diagnose
Locate your work
Email notifications are sent to assigned groups and individuals. There are two ways to locate cases:
- Click List > Cases > Unassigned for my groups to locate your groups’ unassigned cases.
- Click List > Cases > My Cases to locate all active cases assigned to you.
Related list – Action tab in the case form
| 1 | Customer information: including all sold products, contracts, opened cases, SLAs, and important information related to the account. | 2 | Task SLAs: the service level agreements associated with this case. SLAs may differ based on the Account |
| 3 | Interactions: Record phone and email communication with the customer throughout the case lifecycle. | 4 | Draft emails and received/sent emails |
| 5 | Attachment: sent/received for the case. Please Note, all the related records (CHG, INC,REQ,PRB) attachment will be synced to the case. | 6 | Escalations: Locate details and current status if a case was escalated. Please note: Only managerscan de-escalate cases. |
| 7 | QuoteRequests log for the current case. | 8 | Cases: Blocks related to the case. This could be an incident or change |
| 9 | SAP Business Impacts: related to the case | 10 | Requests: Request raised for the current case |
| 11 | Blocked by: If a case is or was blocked either by the customer or internally, this will be displayed on the Blocked By tab. | 12 | Install Base Items affected by the current case. Applicable to Data Centre customers |
| 13 | ProTime Entry recorded by all agents who interacted/worked on the case. |
| State | When used | Actions the agent can take |
| New | The initial state for a new case, which is created through any one of the channels. | Assign to me: The case is assigned to the agent. Accept/Qualified acceptance: If assigned by the customer service manager, the agent accepts the case and the state changes to Open. Save: updates the case. Close Case: Closes the case – only if customer told you to do so. |
| Open | Set automatically. The case is assigned to an agent and the agent clicks Qualified Acceptance. This action changes the state from New to Open. | Update: Updates the case. Request Info: The agent requests additional information from the customer. The action state changes to Blocked by customer. Resubmission: In agreement with the customer, agent can postpone the work required for the case QuoteRequest: Request approval for time for working on the case. Propose Solution: The agent proposes a solution for the case. |
| On Hold | Set automatically if the agent requests more details from the customer. An agent clicks Request Info, changing the state from Open to On Hold. For Resubmission: on agreement the customer, case can be resubmitted. | Open Case: Changes the state back to Open. Update: Updates the case Close Case: Closes the case. |
| Resolved | An agent provides a resolution code and enters resolution notes in the Resolution Information tab and clicks Propose Solution, changing the state from On Hold to Resolved. The Resolution code and Resolution notes fields are mandatory when an agent proposes a solution for the case. | Actions the customer can take: Accept Solution: The customer accepts the solution proposed by the agent. The state changes to Closed and a survey is displayed. Reject Solution: The customer rejects the solution proposed by the agent and the state changes to Open. |
| Closed | A solution is accepted by the customer | AGENT CAN NEVER CLOSE CASE … until instructed by customer. |
| Canceled | The case was raised in error and does not need to be investigated |
Case action status
| Action Status | When triggered | State | Actions taken |
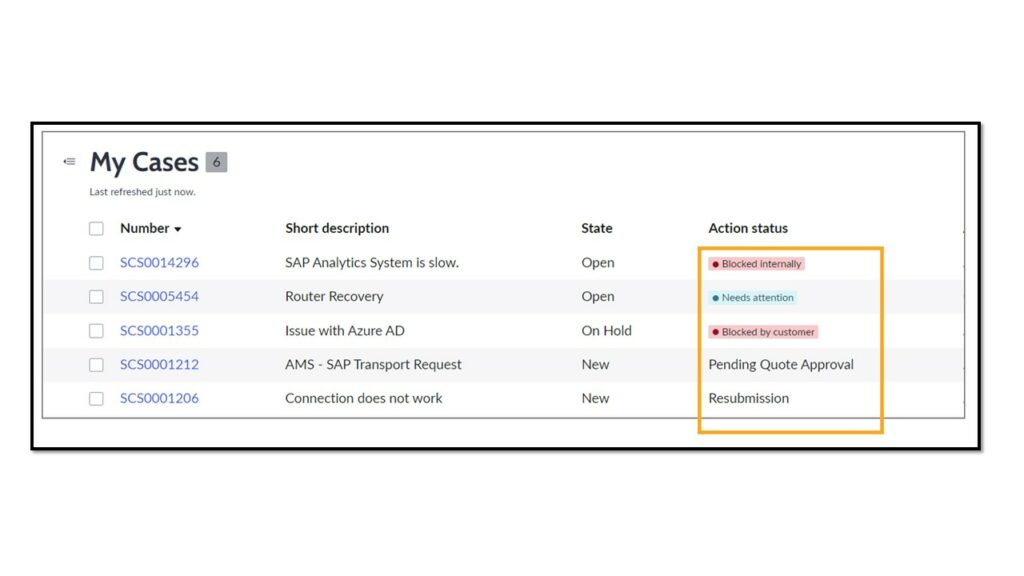
| Blocked internally | When an open related record, linked to the case. | New Open | Agent: Action the related record: Review and closed the record associated to the case. |
| Blocked by customer | When waiting for customer feedback | Open On Hold | Customer: Provide feedback |
| Needs Attention | Cases that have been updated by customers or internal users and are waiting for input or review. Customer service agents and managers can also manually set the action status for cases by enabling the Needs Attention field on the Case form. | New Open Resolved | Agent: Review case: Agent’s attention is required for the case. |
| Blocked internally and by customer | Agents create or link a related records as well as When waiting for customer feedback | On Hold | Customer: Provide feedbackAgent: Action the related record: Review and closed the record associated to the case. |
| Blocked by Vendor | Cases sent to SAP. | On Hold | Agent: Get ticket state: Agent will track the status of the SAP ticket. |
| Pending Quote Approval | Agent requesting additional hours to fulfil the case assessment. | New Open | Customer: Reject/Approve request: Customer must act on the request by approving or rejecting the request. |
| Resubmission | Upon request/agreement with the customer, Agent resubmit the case. | On Hold |
Assign a case to yourself
- Assign a case to yourself
- Start working on a case. The case status changes from New to Open
Open and review attachment
The attachment can be viewed directly in the activity log or (via the 3-dots) the document can be downloaded.
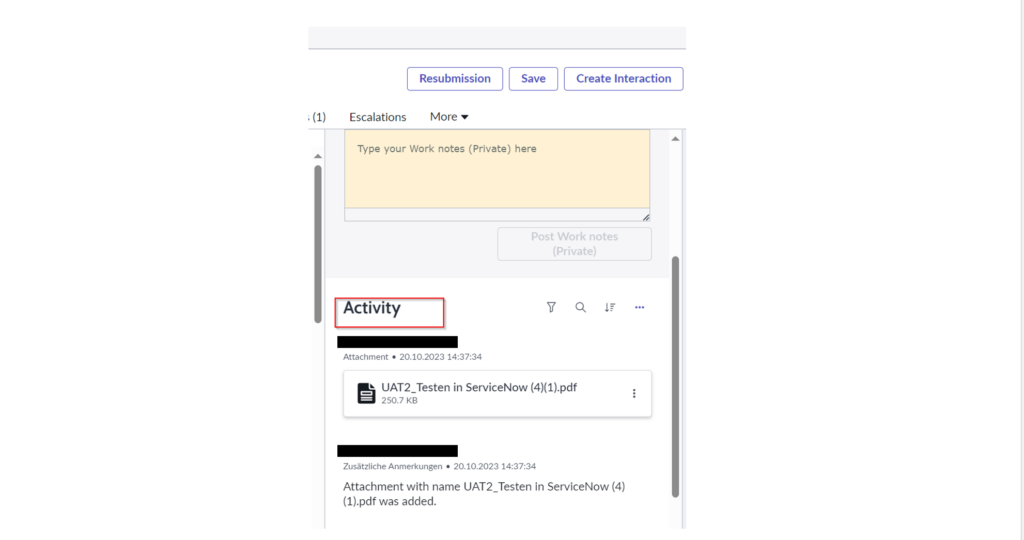
OR:
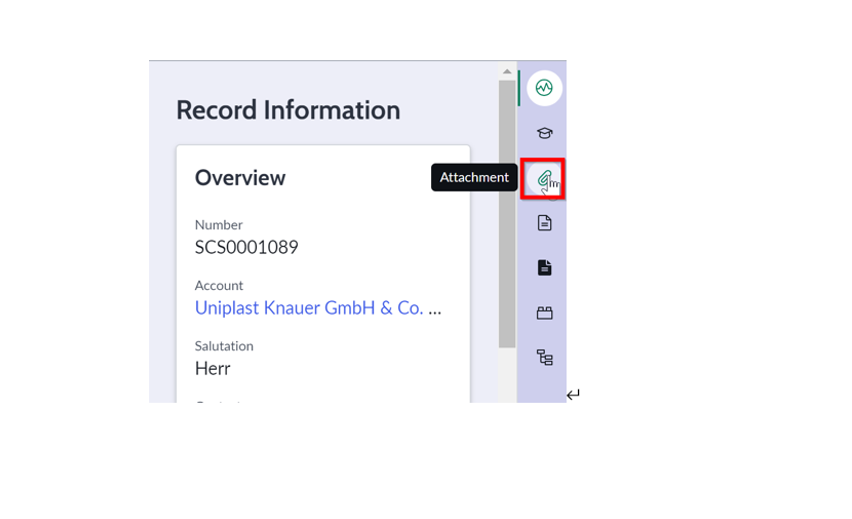
- Click the paper clip on the right edge of the screen „Record Information“
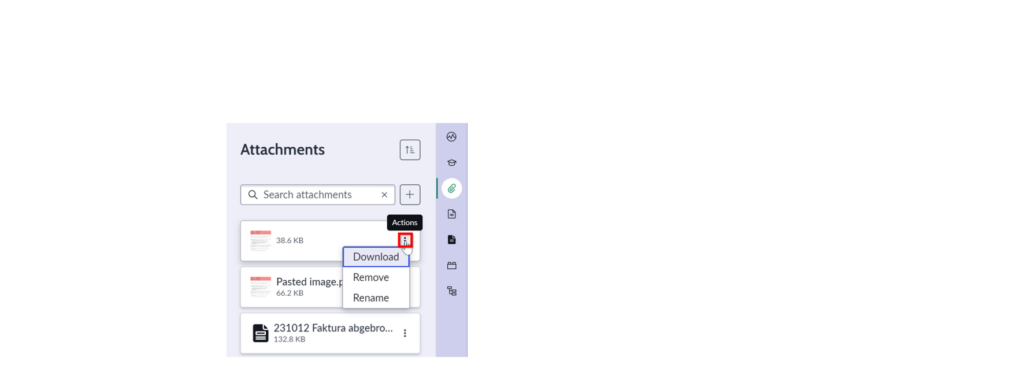
- Click on the three dots („Actions“) and select Download
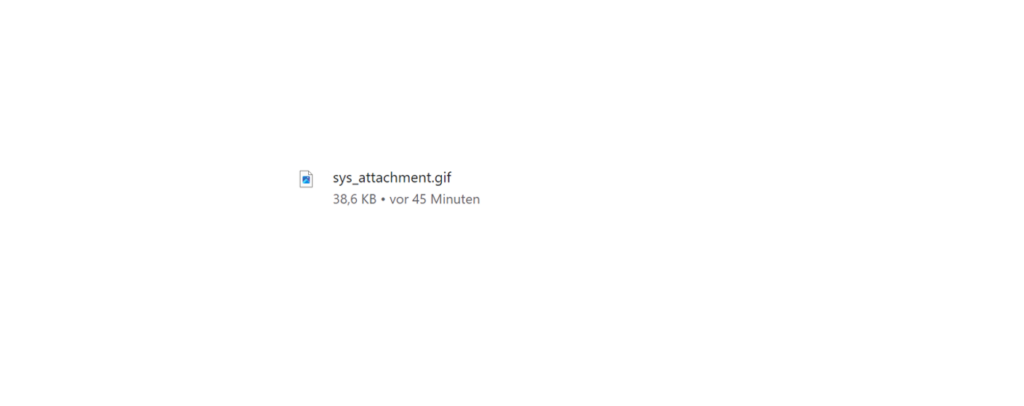
- Open the document from the pop-up
Request Information
- Click Request Info to get additional detail from the account Contact
- Additional comments (in Notes: Additional comments (customer visible)) is required and sent by email to the contact
- Case state is set to On Hold with Action status: Blocked by customer
Waiting for vendor
- Click Waiting for Vendor if the vendor input is required
- Additional comments are required and sent by email to the contact
- Case state is set to On Hold with Action status: Blocked by vendor
- Click Resume to continue the case once the vendor has provided the information/action. The case state returns to Open
Create related records
Agents can create related records directly from the case by clicking the more actions tab and select the record required
| Related Record | When used |
| Create Incident | When A41 is responsible for the Service and if a Configuration Item is impacted. |
| Create Request | When a customer requests something from the catalog item through a case. Agent can raise a request on behave of thew customer. |
| Create Normal Change | When someone wants to change something on the systems which is not a standard change (not pre-approved). |
| Create Standard Change | When someone wants to change something on the system which is part of A41 pre-approved change (routine, major, minor). |
| Create Emergency Change | When someone wants to change something urgently. |
SLAs: Track progress
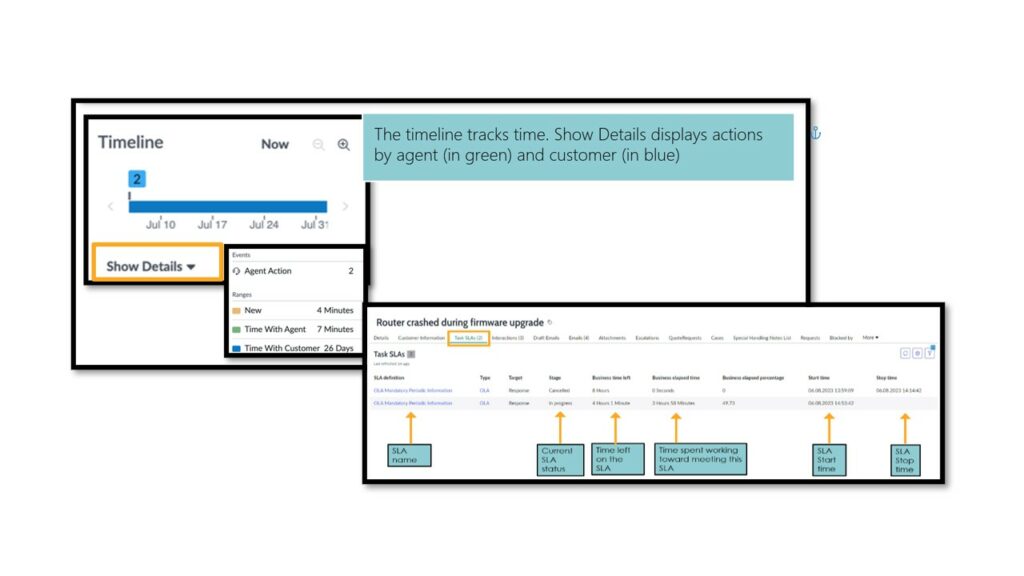
Service level agreements (SLAs) measure time to achieve predefined milestones. Track your progress toward meeting an SLA on the Task SLAs tabA new SLA populates and starts if the priority changes
Escalate Case
Escalate case by going to more actions > Escalate Case
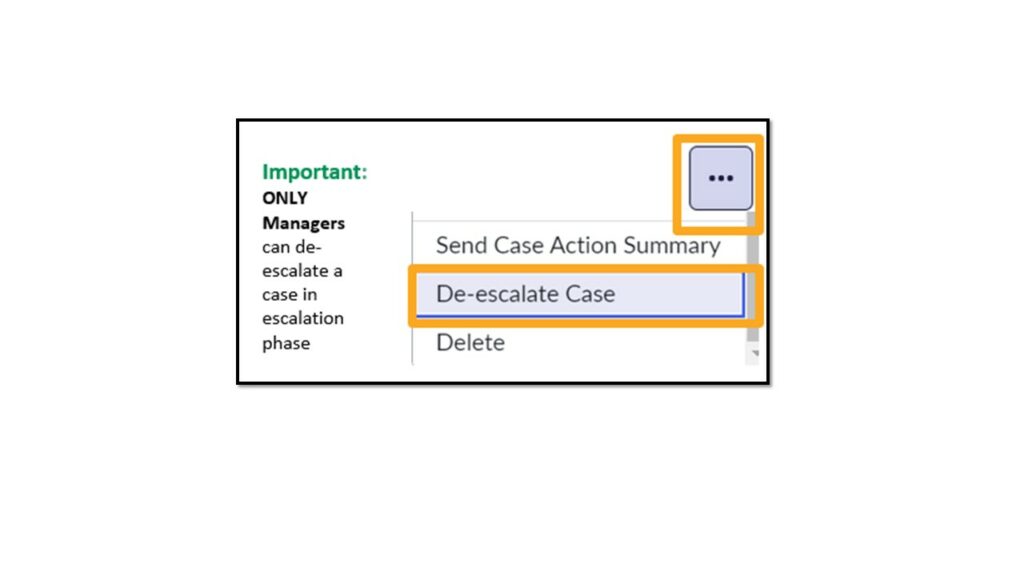
Please note: Only managers can de-escalate cases.
De-escalate Case
De-escalate case by going to more actions > De-escalate Case
Case Resubmission
Agreement with the customer to action the case from a specific date.
- Choose the date when you want the case to be reviewed again on the Resubmission field
- After completing the above action, click on Resubmission
! Make sure you have the customers consent before resubmitting a case!
Quote Request
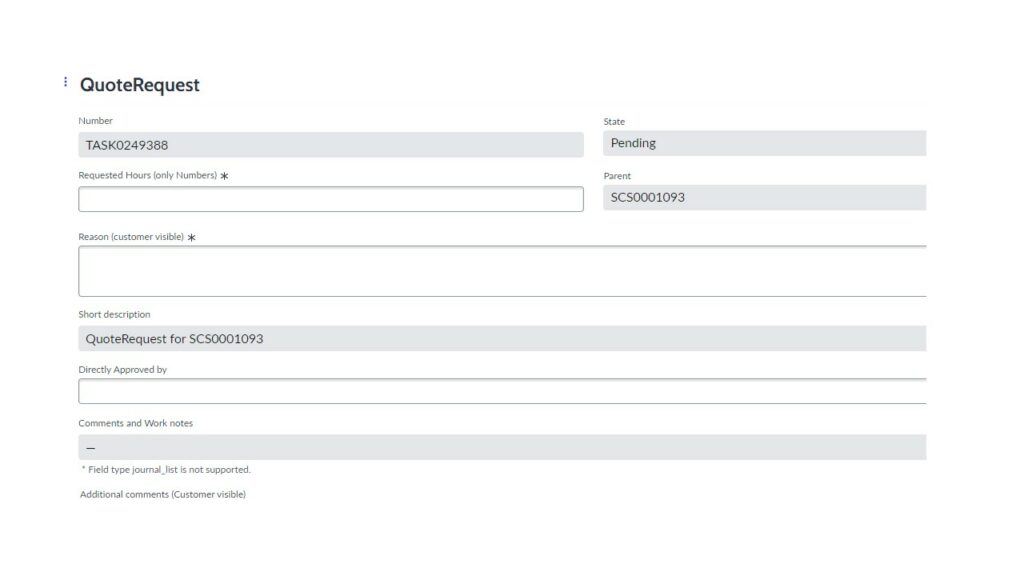
- On the case, select the button Quote Approval
- Update the request form by providing all the required information and Safe
Create an Interaction – Speed Up
An interaction represents a request for speedup and any intercommunication made through a phone call, Case, email etc.
- Navigate to List > my interactions > New or
- On the case, click on Create Interaction
- Provide all mandatory information (*)
- On the category field: Select either Speedup or General and Save
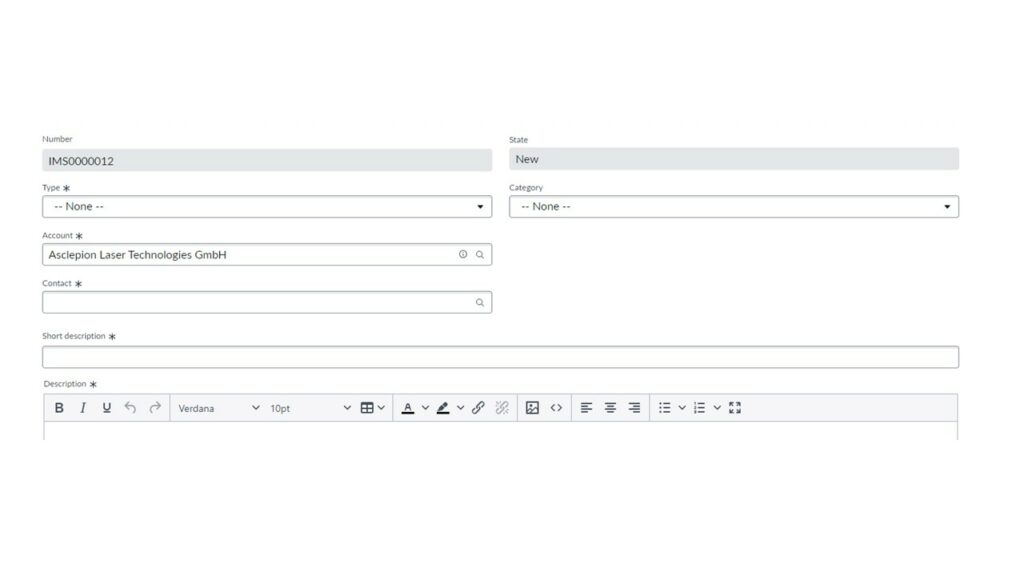
Request SAP Business Impact
- Once the case in Open state. Click more actions > Request SAP Business Impact
- Customer notified to perform the Business impact. Customers can access the form through the link provided.
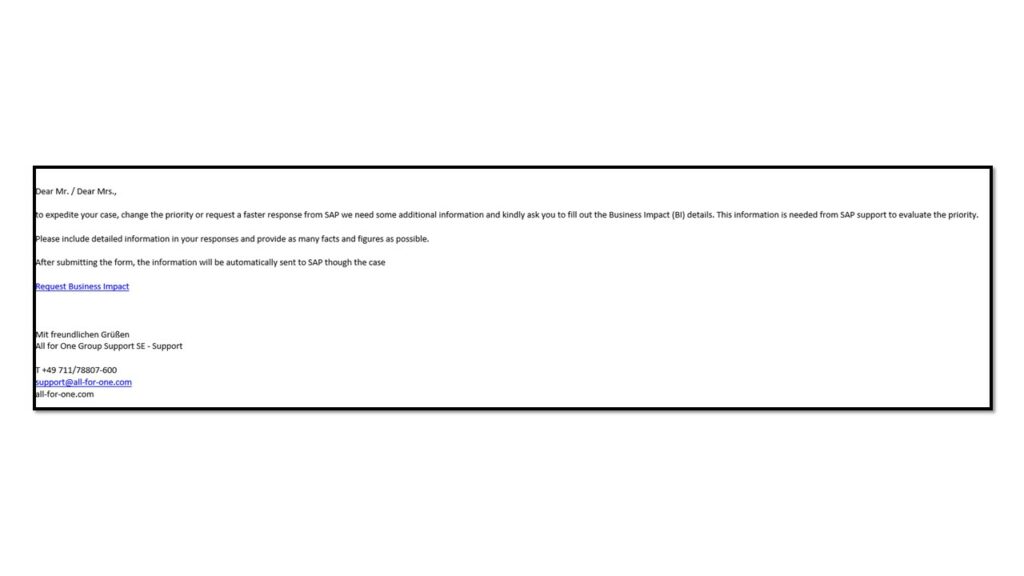
Send Case to SAP
- Ensure the following fields are updated.
– Provide S-User ID
– Provide the SAP Component
– SAP Business Impact (if not updated, request SAP Business Impact) - Inform the Customer by updating the comment section.
- Select “Send Ticket to SAP” from the More action menu.
IMPORTANT: only the intial description and the last „Additional Comment“ will be sent to SAP. Make sure that in your last „Addtional Comment“ everything what was done to solve the case is summarized.
Propose a solution
On resolving the customers‘ Issue or assessed the problem, when agents can propose a solution:
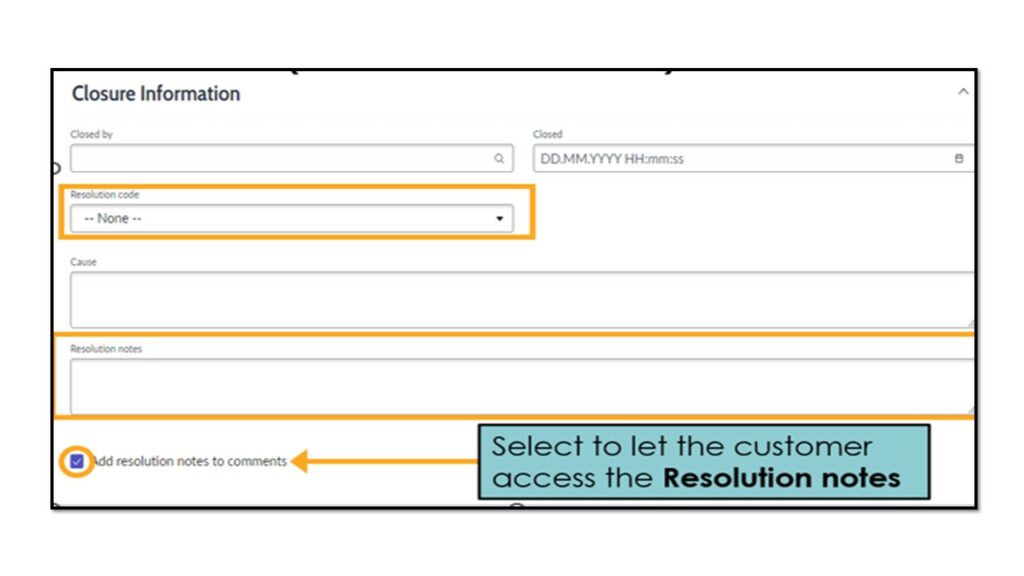
- Summarize the solution using the Resolution code drop-down list, Cause, and Resolution notes fields
- Select Add resolution notes to comments to send an email to the customer with the contents of the Resolution notes.
- Click Propose Solution
Resolve and Close Case
- After the cusotmer service agent has proposed a solution to the customer, the account contact is notified tha the case has advanced to Resolved. The contact can also lovate any comments that the agent added about the resolution.
- Case moves to Closed automatically when the customer Accepts the Resolution.
- When the customer Rejects the resolution and provieds the reason for rejection, case is moved to New State
! Agents are NOT allowed to close a case …. until instructed by customer!
Auto Close
After a case was o´put to the customer with Action Status „Blocked by Customer“ or „Resolved“ an the customer adoens´t react on the case it will beautomatically closed after a defined period of thime. The customer will be informed about the closing of the Case in dependence of the Case state. See table below.
| Resolved | Blocked by Customer | |||
| Prio | Daily Reminder after Calendar Days | Auto Close after Calendar Days | Daily Reminder after Calendar Days | Auto Close after Calendar Days |
| Very High | 11 | 14 | 29 | 39 |
| High | 19 | 21 | 29 | 39 |
| Medium | 28 | 30 | 29 | 39 |
| Low | 28 | 30 | 29 | 39 |
New ProTime Entry (all ITSM Objects)
To book a new ProTime entry directly from a ServiceNow object (incident, Case, Change e.g.) click on the button „New ProTime Entry“.
Note: the button is not available when the object has the State „Closed“.
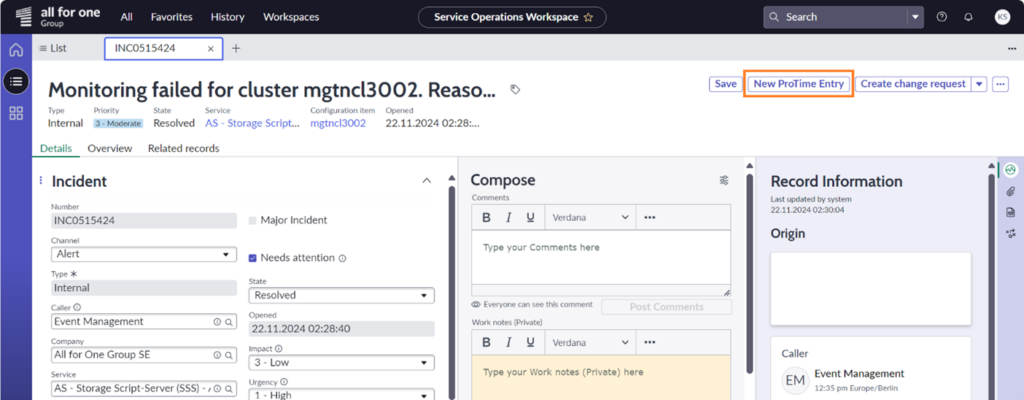
After clicking the button „New ProTime Entry”, a formular will open in a new Tab.
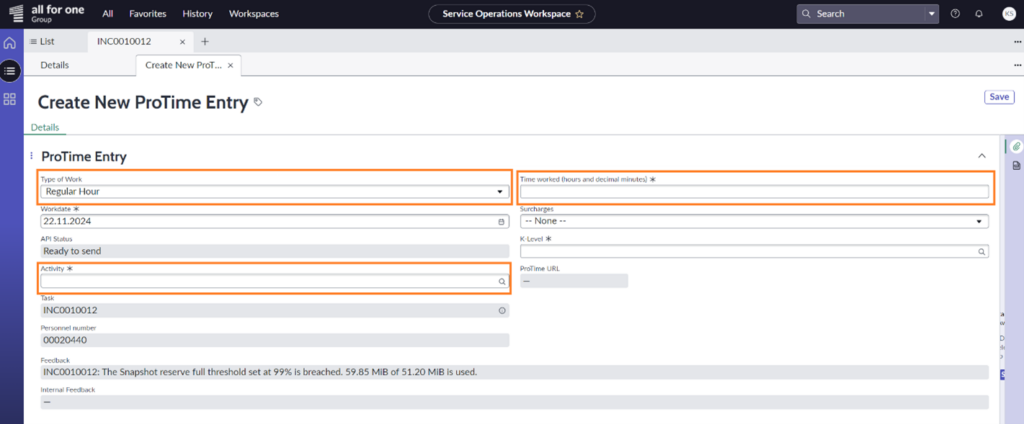
The following fields must be filled for the booking:
- Type of work
- Activity
- Time worked
- Operations: mainly used by the Service Operations team.
- Ticket Management: Monitoring or other non-billable services within the scope of case processing for employees of the Support Unit.
- Service Management: services as part of a service package. AT THE MOMENT this is not used for the current sold products in the case processing.
- Consulting: Billable services OR services within the scope of SAP Maintenance
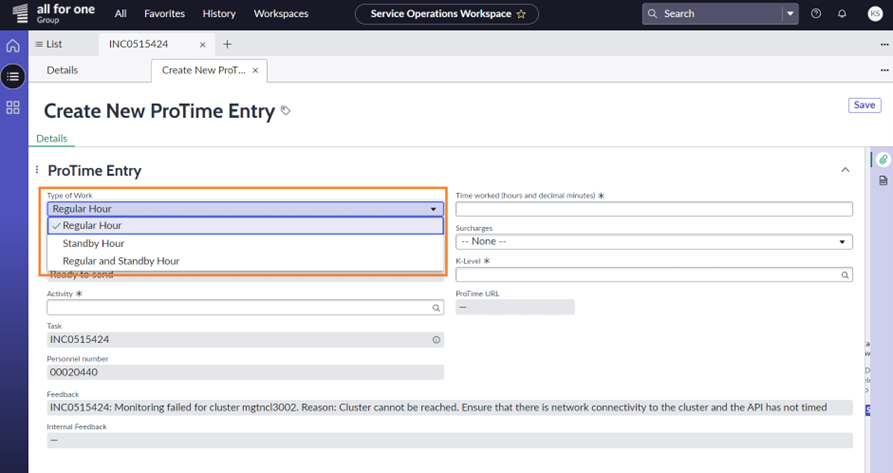
Type of work
You will have the following types of work for selection:
- Regular Hour: for bookings within Business hours
- Standby Hour: for bookings outside of business hours (mostly used by Operations)
- Regular and Stanby Hour (mostly used by Operations)
Activity
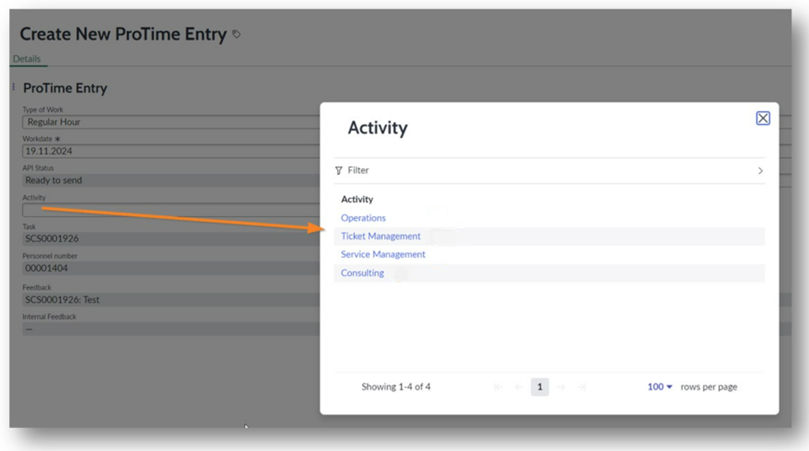
There are four types of activities for selection:
- Operations: mainly used by the Service Operations team.
- Ticket Management: Monitoring or other non-billable services within the scope of case processing for employees of the Support Unit.
- Service Management: services as part of a service package. AT THE MOMENT this is not used for the current sold products in the case processing.
- Consulting: Billable services OR services within the scope of SAP Maintenance
Time worked
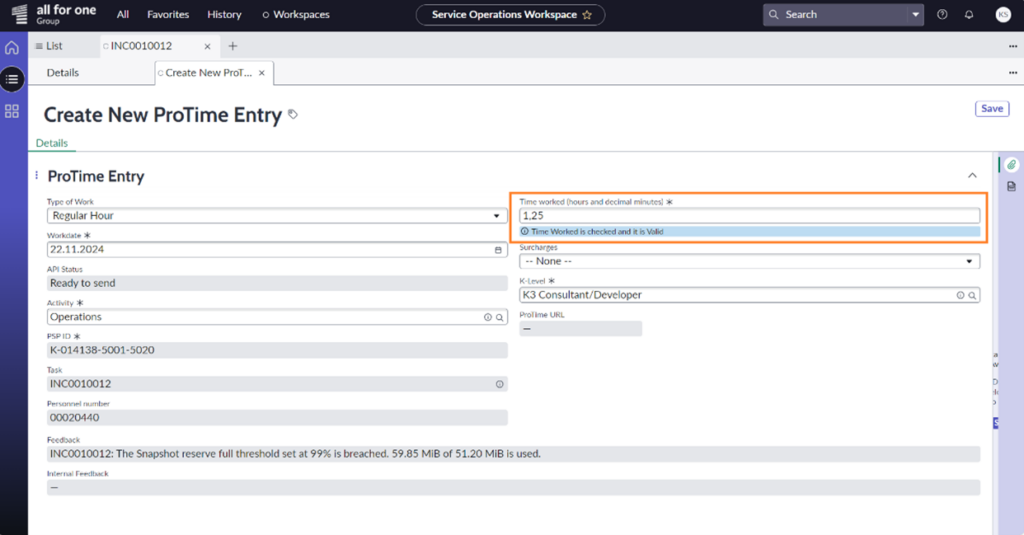
The time worked must be entered in hours and decimal minutes.
For example: 15 minutes = 0,25 / 30 minutes = 0,5 / 45 minutes = 0,75 / 1 hour = 1
Thus, 1 hours and 15 minutes = 1,25
Standby Hour and Compensation choices
If you select type of work Standby Hours or Regular and Standby Hours, you will need to fill the field “Compensation Choice”. There are four compensation choices to be selected:
- Standby duty – time compensation
- Standby duty – payment
- Special assignment – time compensation
- Special assignment – payment
Assignment for St/Sun/Holiday? Standby Hour and Compensation choices
With the compensation choices, please select the Assignment for St/Sun/Holiday if applicable:
- Night shift
- Saturday addition
- Sun – and holiday
Create a new ProTime Entry – Regular hours
To book a new ProTime entry for regular hours proceed as follow:
- Select the type of work Regular hour
- Choose the activity
- Enter the Time worked
- Click on Save
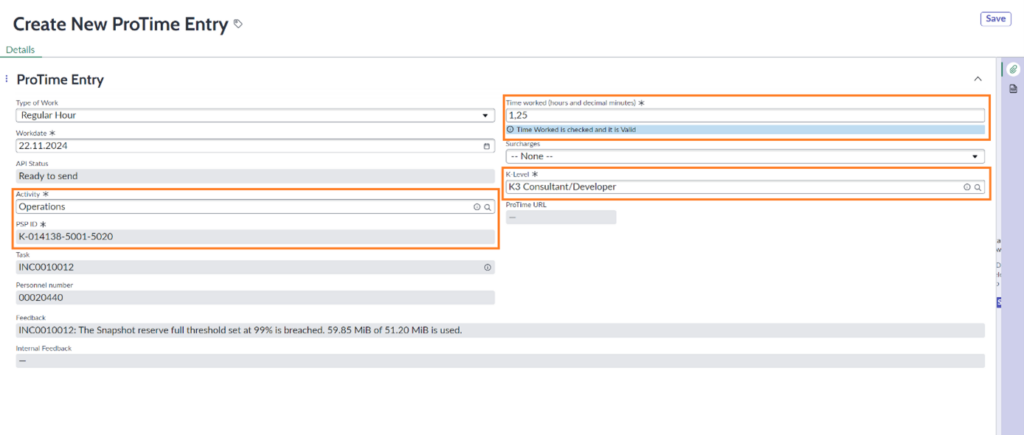
The PSP is automatically set up according to the sold product/Service and the selected activity. If the PSP is valid in the ERP system MMP, the valid K-levels are also displayed.
The K-level stored in the employee’s profile is pre-filled if valid.
IMPORTANT FOR SERVICE DESK AND IT QUALITY MANAGEMENT: for monitoring/coordination/pre-qualification of a case or incident, the activity „Ticket Management“ must now be selected and in this case also K-level 3.
NOTE: After saving the entry make sure that the API Status Field changes the Status to “Sent successfully”. A URL to your ProTime Entry is then available.
In case of error in the API status, an error message will appear in the field “Internal feedback”. If a re-send is not successful, please contact your manager.
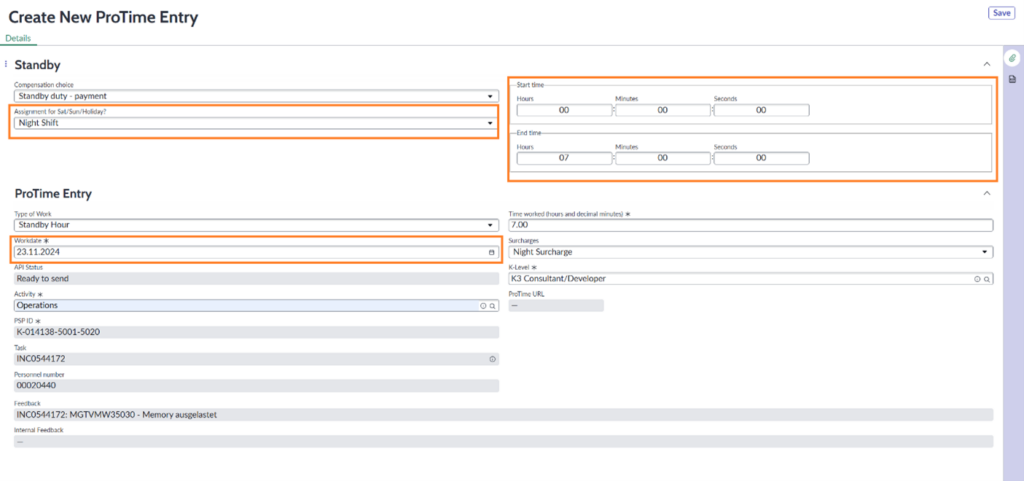
Create a new ProTime Entry – Standby hours
For ProTime booking in Standby hours, select the fields as follow:
- Select the Type of Work Standby hour
- Select the Compensation choice
- Choose the Activity
- Add the Start Time and End Time
- Click on Save
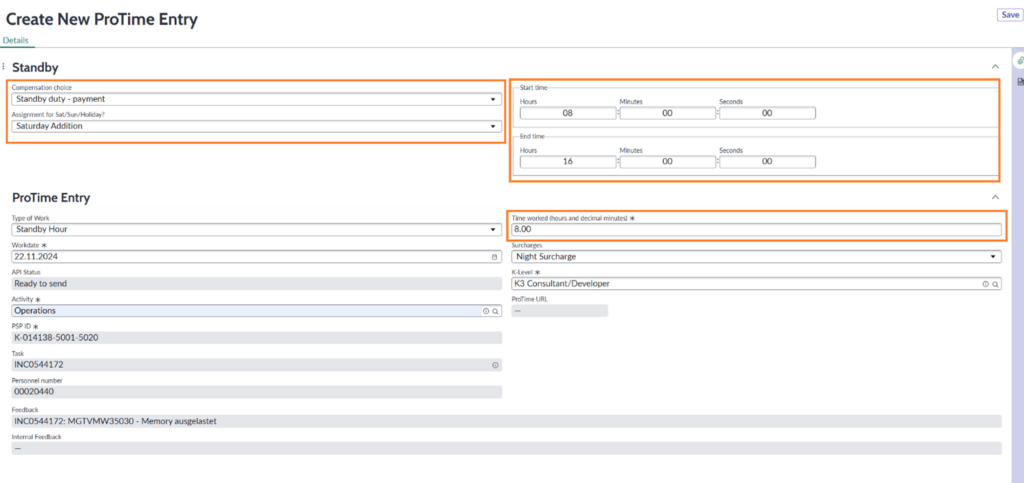
The PSP is automatically set up according to the sold product/Service and the selected activity. If the PSP is valid in the ERP system MMP, the valid K-levels are also displayed.
The K-level stored in the employee’s profile is pre-filled if valid.
NOTE: After saving the entry make sure that the API Status Field changes the Status to “Sent successfully”. A URL to your ProTime Entry is then available.
In case of error in the API status, an error message will appear in the field “Internal feedback”. If a re-send is not successful, please contact your manager.
Create a new ProTime Entry – Standby hours/night shift
As is not possible to make a cross-day booking in ProTime, when creating a new ProTime entry for Standby hours in the Night shift, you will need to create two separate entries.
Create the first entry:
- Select the Type of Work Standby hour
- Select the Compensation choice
- Choose the Activity
- Add the Start Time 22:00:00 and End Time 23:59:59
- Click on Save
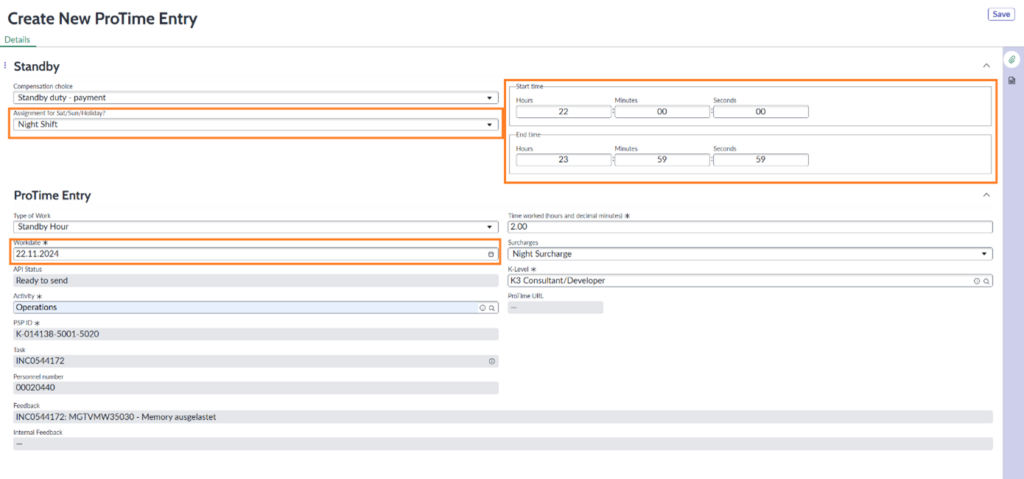
And then create the second entry:
- Select the Type of Work Standby hour
- Select the Compensation choice
- Choose the Activity
- Add the Start Time 22:00:00 and End Time 23:59:59
- Click on Save